|
|
|
|
Multi-Planar
Reformat (MPR) Window
The MPR window enables visualization of a image volume onto 3 orthogonal planes.
It also includes various tools for visualization and interaction
with analyzed data such as BOLD, DTI and
Co-registration. It can be launched from the main menu via: Process->Multi
Planar Reconstruction... This window will also be launched automatically at the end of
running the BOLD/DTI Loading Wizard . It can
also be opened from the BOLD module and DTI module . The MPR window floats independently
of the nordicICE
workspace. The MPR window includes 4 main components. These are, from
left to right, the "Data Panel", the "MPR views",
"3D window" and the "Interaction Panel". Depending on the
workflow, only some of these components may be active/visible.
Data Panel
The
data panel provides an overview of all datasets available in the current
session where each dataset is represented as a thumbnail image. It is
divided into 2 sections called 'Source datasets:' and 'Derived datasets:'.
The former section contains all datasets that has been loaded into the
application, while the latter contains all datasets that has been generated
by nordicICE in the current session (e.g. various
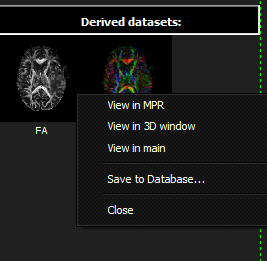
parametric maps and processed datasets). Each
thumbnail has various actions related to it which
can be accessed by right-clicking on a given thumbnail:
View in MPR: View the dataset in the MPR. This will change the current
visualized dataset in the MPR windows to this one. This can also be done by
drag-and-drop of the thumbnail onto any of the three MPR image planes. View in 3D window: View the dataset in the 3D window (if enabled). This will change
the current visualized dataset in the 3D window to this one. This can also be
done by drag-and-drop of the thumbnail onto the 3D window (for DTI 3D window
only). View in main: View the current dataset in the main nordicICE workspace. This
will create a 'floating' image window in the standard workspace of nordicICE.
This can be done to utilize all the tools available in the workspace on the
dataset such as Region of Interest measurements etc. Save to Database... Saves the current dataset to the DICOM database. Close: Closes / deletes the current dataset from the session. Note that
you can not close a dataset that is currently being
visualized. MPR Views
The MPR views projects the current image volume on three
orthogonal planes. The various functions and features available are described
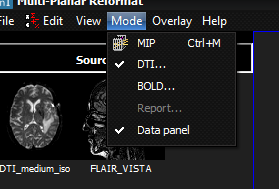
in the following sections: 3D window
The
3D window is located in the lower right corner of the MPR viewing window, and is used for 3D visualizations of the input
image volume and associated data. The 3D window is only active when either
the DTI or MIP mode is enabled (see section on Interaction Panel below),
whereas it is used to visualize white matter fiber
tracts reconstructed from DTI data or Maximum Intensity Projections (MIP)
respectively.
|
|