|
|
|
|
Segmentation
analysis
Segmentation
is a special kind of ROI where the region of interest is generated based on
pixel thresholding. The resulting ROI is a scatter ROI (see “ Region of
interest (ROI) Analysis”) which can be saved and reloaded like any other
ROI. Note
that segmentation can be performed globally on a whole image or regionally
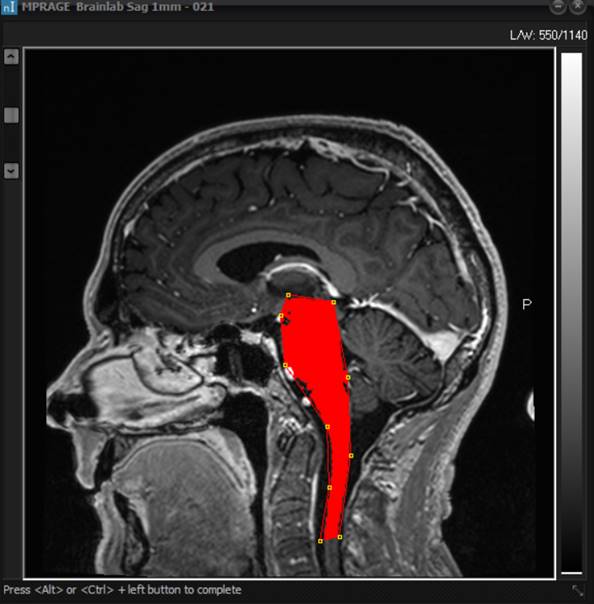
within a ROI. To limit the segmentation to a ROI, draw a freehand or polygon
ROI on the image prior to activating the Segmentation function. The ROI can
be modified during the segmentation process (i.e. by moving one of the
anchors in the polygon ROI) and the segmentation will be updated accordingly.
Example
of applying segmentation
Example
of applying segmentation to a defined ROI (left) and globally (right). The
ROI limited segmentation is automatically performed if a polygon or freehand ROI
is active when the Segmentation function is activated. On
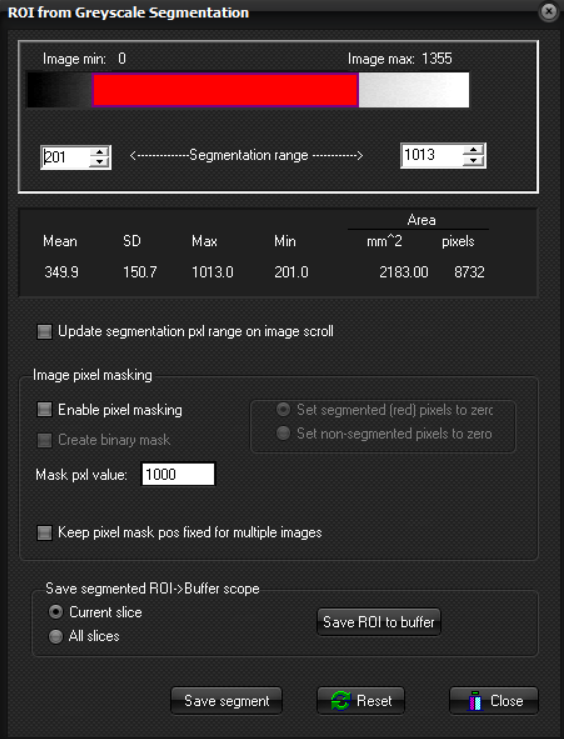
activating the Segmentation function, a dialog will appear: The
Segmentation
dialog window enables dynamic modification of the pixel thresholding values
as well as other relevant ROI related options. The red bar indicates the
pixel level which is currently segmented (note the segmentation color is always
red). The threshold can be adjusted interactively by right-clicking one of
the edges of the bar and dragging it to the left/right to expand/reduce the
length of the bar. The length of the color bar then reflects the range of
segmented pixels which is also reflected in the editable number boxes at
either end of the threshold bar. The upper/lower segmentation values can be
edited manually by entering the appropriate values in the boxes. The numbers
above the boxes indicate the maximum and minimum pixel value in the image. Max/ Min Segmentation range: For DICOM images, the segmentation range can be set to include
the entire pixel range in the image or just to the windowed range (set with
the Image Intensity/Contrast function). In some images, the pixel data may
contain some outliers which will tend to make the pixel range of interest
limited to a small part of the dynamic range. In this case, set the Window
range to the range of interest and select rather
than under this option. For most images, however, this setting
will have little effect on the segmentation. Update segmentation on image scroll: When this option is checked, the segmentation will be updated
according to the pixel max/min in the new image when a new image is made
current by image scrolling. If this option is unchecked, the pixel range will
be kept unchanged on image scrolling. Segmentation stats: This window displays statistical data about the segmented region
(similar to the statistics shown in the ROI Statistics window). Pixel mean,
SD, segmented area and number of segmented pixels is shown. Pixel area is
only correct for DICOM images where the pixel size is available in the DICOM
header. Enable pixel masking: The selected region will be masked out and optionally set to a fixed value specified pixel masking value. Alternately, the non-masked region is set to the specified value. The masking operation can be applied only to the current slice or all slices, depending on the option ‘Update segmentation on image scroll’. : Save the segmented pixels as a scatter ROI to the ROI Buffer
(see “ The ROI Buffer ”).
The segmented ROI can then be treated like any other ROI in the buffer. Save ROI->Buffer scope: Current slice: The segmentation setting will only be applied to the current
slice. : All slices in the series will sequentially be scrolled through
and the segmentation will be applied to all slices in turn and saved to the
ROI Buffer. This is an efficient way of applying the same segmentation
setting to many slices and save the resulting segmented pixels to the ROI
Buffer. : The segmented pixels are save as a single ROI file (with
extension : Resets the segmentation range to default values. : Close the Segmentation window. Example of
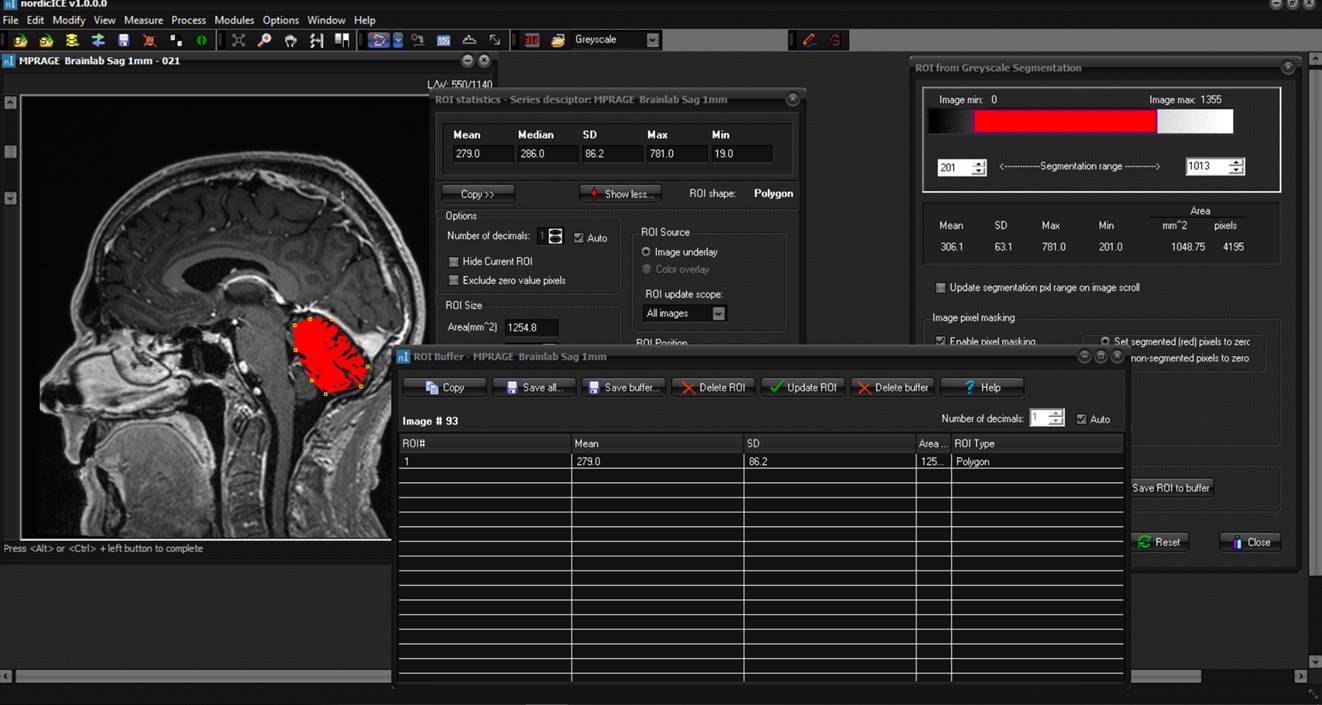
Segmentation limited by a Polygon ROI.
Example
of Segmentation limited by a Polygon ROI. The segmented pixels are shown in
red, and the segmentation range is adjusted interactively in the ROI from
Grayscale Segmentation window (botton left). The ROI Statistics window
(bottom right) displays the ROI statistics for the polygon ROI defining the
boundaries of the segmentation process. The upper right window is the ROI
Buffer window showing the results of saving the segmentation as a scatter
ROI to the ROI Buffer using the
function in the segmentation dialog. Resulting
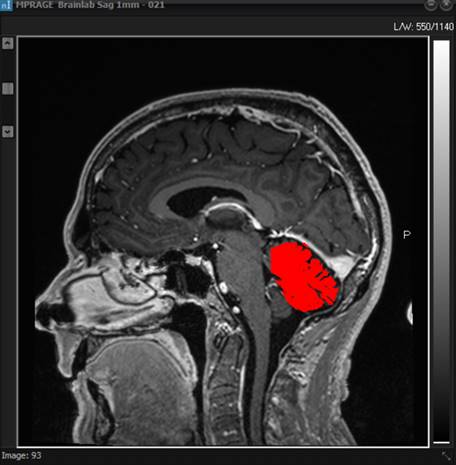
image obtained after saving the segmentation
Resulting
image obtained after saving the segmentation in “ Example of
Segmentation limited by a Polygon ROI. ” as a scatter ROI and reloading
the ROI (as a Related topics:
Draw
and Measure Pixel Values in a Region of Interest (ROI)
|
|