|
|
|
|
DICOM
Reader
nordicICE
has a DICOM reader which sorts DICOM image files in a specified directory,
including sub-directories on the basis of information stored in the DICOM
header. The DICOM Reader Interface has been specifically developed to ease
the management of DICOM image files. The reader can interpret most current DICOM
3.0 image formats. The DICOM reader is not connected to a database, but scans
the selected directory (including sub-directories) for DICOM files. The DICOM
standard is open to vendor specific implementations using private and
non-disclosed tags and consequently varies. On some systems, for instance,
the image number tag is not used, and image sorting may have to
be according to the X- , Y- or Z- position of the individual slices. The
nordicICE implementation is designed to take into account these differences
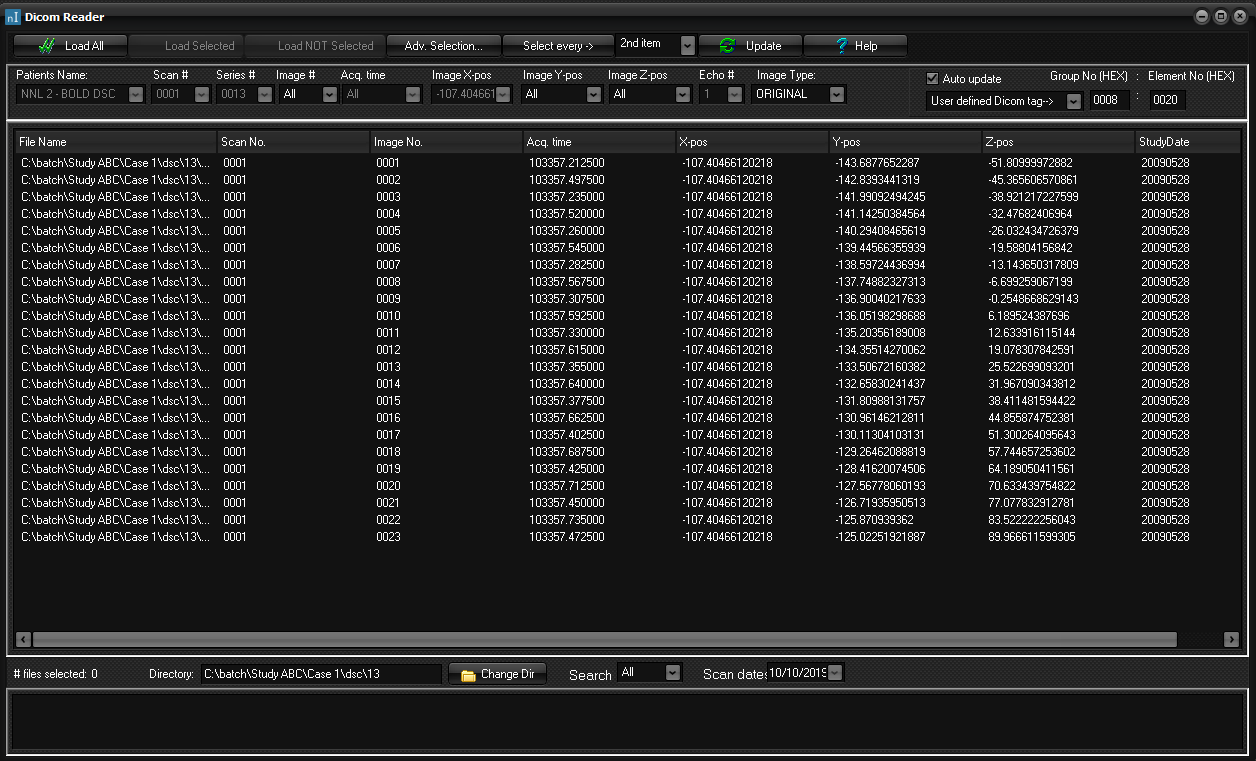
and manage DICOM images in the same manner regardless of vendor. The nordicICE Dicom
Reader Interface
Navigation in the
DICOM Reader
Selection
of the desired drive and directory is done either by typing the directory
name in directly or by clicking the button
to open the Select
Directory dialog. Double click on a specific directory in a
directory tree to select it. On
selection of a directory the DICOM reader automatically scans the directory
and all subdirectories for DICOM image files. Clicking on the
button scans, or rescans, the current directory, including any
sub-directories. The detected DICOM image files are then displayed in the
file window. Note that the DICOM reader searches the entire drive or
directory for all DICOM images, so should a directory with a large amount of
imaging data be selected, this can be a time consuming process. It is best to
select, where possible, the subdirectory containing only those image datasets
to be viewed. A given scan of a selected directory may be aborted by pressing
the Esc
key. Image sorting in the DICOM Reader
The
image files located and read by the DICOM reader are presented as a list in
the reader window. They are initially listed by default according to time
point. The individual columns in this window show relevant attributes about
the individual files, extracted from the image header. Images may be sorted
according to any of these attributes by clicking on the column header. The
following attributes are available: File Name, Scan No.,
Image No.,
Image
time, X,
Y
and Z
position of the image (i.e. the precise 3 dimensional co-ordinates for a
given slice) and Series
No. If one of these attributes is not available from the DICOM
header, the column is either left blank or contains the letters 'NA'.
Clicking on any of the files in the list displays basic information about the
image in the window at the bottom of the reader. The
DICOM search process can be narrowed down by searching according to a date
filter. Images acquired before, after or on a specified date may be
identified by appropriate selecting the options in the drop down menus.
Clicking on
carries the search and only those image files selected by date appear in the
reader window. Note that the date selective search is performed according to the
time stamp of the DICOM files and not the actual scan date of the
acquisition. Image selection and loading in the DICOM Reader
The
option loads all images in the reader window into nordicICE in the order they
are listed, following whichever sort options may have been carried out. Image
files may also be selected manually in the same manner as in Windows
Explorer. Once image files have been selected they may be
loaded into nordicICE using the option. Alternatively, a
subset of images to be discarded may be selected, and using the option all images except those selected will be
loaded. Drop
down menus are provided for image selection according to the following
attributes: Patient
Name, Scan
#., Series
#., Image
#., Image
time, X-,
Y-
or Z-position
of the image, Echo
No. and Image
Type. The default selection is All. All the available
values for a given attribute may be viewed in the respective drop down menu,
and clicking on the chosen value will select only those images. Subsequently
only this subset of images will then be presented in the reader window. Where
there is only one value such as if the read images are all from a single
patient or a single scan, the value is presented in grey and the drop down
selection menu is unavailable. Selection according to multiple criteria may
be made by selecting values for as many attributes as desired. If a
combination of attributes is selected which is not present in any images, the
file list will be empty. If this occurs, reset one (or all) of the selection
attributes to All.
Right-clicking
any of the files in the file-list will automatically select all images within
a constant offset in acquisition time relative to the selected (right-clicked)
image. This is very useful for automatically e.g. selecting image series
belonging to the same time-series (paradigm) in an fMRI acquisition. Since
the acquisition time may, on many scanners, vary slightly between successive
volumes in an fMRI time series, a user defined tolerance can be set in:
This
option defines the maximum deviation in time between successive image series,
relative to the difference between the selected image and its nearest
neighbours (in time). Related topics:
DICOM
database
|
|