Batch
Analysis - ROI Analysis and Image Pixel Extraction
The
batch capabilities for ROI analysis allows for extraction of statistical parameters
and pixel values in volumes defined by mask images. The wanted operation is
usually to create a mask on a structural series, and then apply this mask on
a functional map to extract statistical parameters in the volume defined by
the mask. An example could be to define a tumor
volume on a structural series and then apply this mask on a blood volume map
that has been extracted from a perfusion series to find the mean blood volume
content in the tumor.
To
do ROI analysis in batch do the following steps:
1.
Coregister the structural series to the functional series from which the
functional maps will be extracted from. This can be done using the batch
capabilities for coregistration. It is important to do this before
creating the mask as the mask will inherit the coregistration parameters from
the structural series.
2.
Create
the inclusion mask using the Pixel Edit functionality on the
structural series. It is also possible to create a mask that will serve as an
exclusion mask.
3.
Do
the calculations of the functional maps. This can be done in batch if the
analysis in question is available in the batch module.
4.
Do
the ROI analysis in batch. All files involved must
be in Nifti-format (one file per image series).
Step 1 can be dropped
if the masks are created on one of the images to be analysed or the
series from which these were extracted.
The settings for the ROI analysis is split into two tabs, one for file
specification and one for statistics.
File settings:
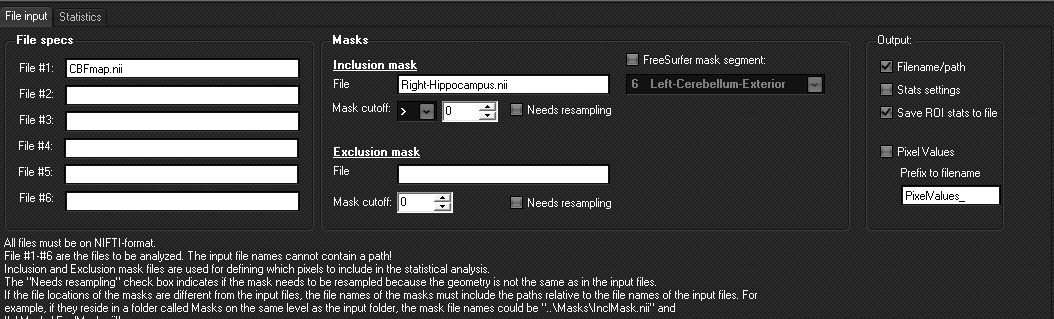
- In File #1-6 Nifti-files
holding the image series to be analysed must be listed. These image file
names should not contain a path, only a file name. This means that all these
files must be in the same folder. When clicking the <Search for
files> button on top of the Batch Analysis Settings window, nordicICE
will search for folders in the folder tree starting at the Base
Directory that contain at least one of the files listed.
- Mask files are given in the File entry under the
Inclusion/Exclusion headings. These entries can contain a path if the
masks are not located in the same folder as the input files. The path
must be relative to the location of the input files. No mask file given
means that no mask is used.
- The cutoff value for the
masks allows for setting a minimum value in the masks. I.e only pixels in the masks with values above
the cutoff values are part of the mask.
- The <Needs resampling> check box
determines if the mask must be resampled to the resolution and geometry
of the input files. This will be the case if the mask is created on some
other image series than the image series to be analysed, for example if
the mask is created on a structural series.
- Output settings determines what will be put into the
output text file. Checking the <Pixel Values> check
box will produce a file containing all pixel values of the pixels
selected with the inclusion/exclusion masks.
- Selecting the option <FreeSurfer
mask segment> enables selection of a specified FS-generated brain
segment as input to the ROI analysis. In this case, the ‘Inclusion mask’
must be a FS-generated brain segmentation file (typically a aparc+aseg.nii file, see Batch Analysis - FS-segmentation for details)
Statistics settings:
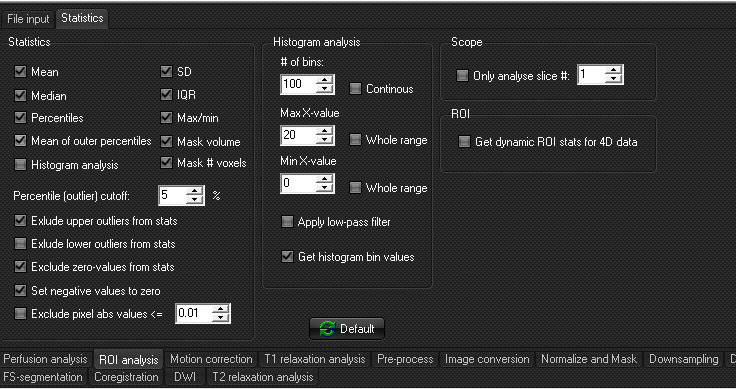
- The check boxes in the statistics frame determines which
statistical parameters should be included in the report and what cutoff values to use.
- The Histogram Analysis frame controls the output of
the histogram.
- If the input data series defined in <File spec>
is a 4D (dynamic) series, selecting the option ‘Get dynamic ROI stats for
4D data’ will extract the ROI stats for all dynamic timepoints in the
series.
Related topics
Batch Analysis - FreeSurfer/FastSurfer (FS)
-segmentation
|