Volume
of interest and tumor segmentation
The selected VOI can
either be the whole image volume, or a volume selected by seed growing or
manually selecting voxels to be included in the analysis.
Whole image analysis: From
the <Perfusion> tab,
selected <Analysis
scope><Whole image>. This is the default mode, and the
entire perfusion image volume is analysed. The noise threshold in the data is
then automatically determined as part of the perfusion analysis.
It
is recommended to do VAI analysis for the entire volume. The segemented lesion mask can also be used for measuring
statistical parameters on the maps.
Lesion segmentation is
initialized by pressing  on main menu bar. When
activated, the <Lesion
segmentation > tab is shown in the right panel (figure 1). The
functionality here is based on the <Pixel
Edit > option already available is nordicICE, but has been
extended /improved as follows: on main menu bar. When
activated, the <Lesion
segmentation > tab is shown in the right panel (figure 1). The
functionality here is based on the <Pixel
Edit > option already available is nordicICE, but has been
extended /improved as follows:
- Full MPR interaction: seed points for seed growing
can be placed in any of the orthogonal MPR views. Same for ‘manual’
placement of mask voxels (using the <add/erase> voxels option)
- Seed growing limited by selected VOI
- Range of additional morphologic operations:
- Open/close for removing ‘speckled’ pixels
and filling in ‘holes’ in lesion mask (e.g. central necrotic
regions)
- Erode/dilate options to expand/shrink final lesion
mask
When applying
seed growing based segmentation, the segmentation range is limited by the VOI selection, combined
with the Segmentation
range setting. VOI is defined, either by the  icon on main toolbar, or by checking the
<Set target VOI> button within in the Lesion segmentation tab. This
defined the volume of interest which limits the range of the seed growing
expansion in all three dimensions. The VOI rectangles will appear in the MPR
views (figure 2) and can be adjusted in size position in any of the MPR
windows and will be adjusted accordingly the orthogonal views. icon on main toolbar, or by checking the
<Set target VOI> button within in the Lesion segmentation tab. This
defined the volume of interest which limits the range of the seed growing
expansion in all three dimensions. The VOI rectangles will appear in the MPR
views (figure 2) and can be adjusted in size position in any of the MPR
windows and will be adjusted accordingly the orthogonal views.
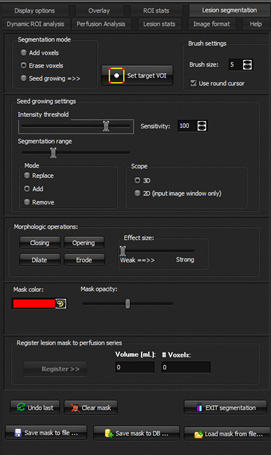
Figure 1: Lesion segmentation / seed
growing menu options.
Lesion segmentation is most performed using the following steps:
2.
Place
a seed point within tumor region in any of the three MPR planes using default
settings. The resulting (3D) defined selected volume will be shown in the
three MPR views (figure 2). If the resulting segmented volume is too
large/small, try adjusting the <sensitivity
> and <segmentation
range > parameter
3.
Erase/add
voxels to mask in current plane using the add/erase pixel option and ‘draw’
voxels to be added/removed. Use morphometric operations, if required, to fill
(close) in necrotic regions or expand/ shrink (dilate/erode) mask.
4.
Note
that multiple VOIs can be defined; i.e. seed growing can be defined within
one VOI and the VOI can then be moved to a new position and a second seed
growing operations can be done within this region.
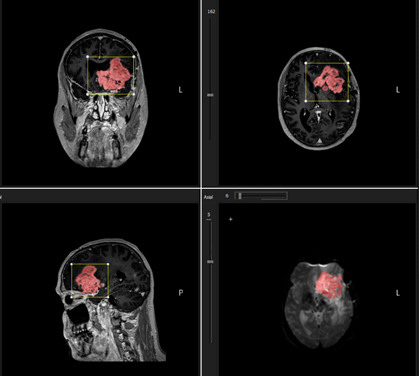
Figure 2: Sample result of initial 3D seed
growing from placing a single seed point within tumor region. The VOI sets
the limitation of the seed growing extension
Once the lesion mask is defined and edited, it can be saved to
file by pressing the <Save mask> option.
Loading lesion mask
from file: A predefined lesion mask (a binary Nifti file) can be loaded from file using the <Load lesion from file> option.
Once loaded, remember to press <Register>
. Also, a drawn lesion mask can be saved to file using the <Save> option.
NOTE: if image co-registration is performed, this should be done
before a
lesion mask is loaded from file to ensure correct positioning of the mask.
The mask file is assumed to already be co-registered with the structural
series prior to loading.
Saving lesion mask to Dicom database: The active lesion mask
can be saved to the nordicICE DB as a binary Dicom
object by pressing <Save mask to DB>. The mask will then be added as a
new series to the patient series containing the scan from which the VAI
module was started.

|